
Have you ever had to develop an application that stored sensitive data, like credit card numbers or social security numbers? This is a super common use case for databases, and it can be a pain to save this data securely. In this post, you will learn how to encrypt document fields client-side in Node.js with MongoDB client-side field-level encryption (CSFLE).
In addition to CSFLE, there are some incredible security features that come packaged with MongoDB. For example, you should know that with MongoDB, you can take advantage of:
- Network and user-based rules, which allows administrators to grant and restrict collection-level permissions for users.
- Encryption of your data at rest, which encrypts the database files on disk.
- Transport Encryption using TLS/SSL which encrypts data over the network.
- And now, you can even have client-side encryption, known as client-side field level encryption (CSFLE).
This is a list of MongoDB security features offered and the potential security vulnerabilities that they address:
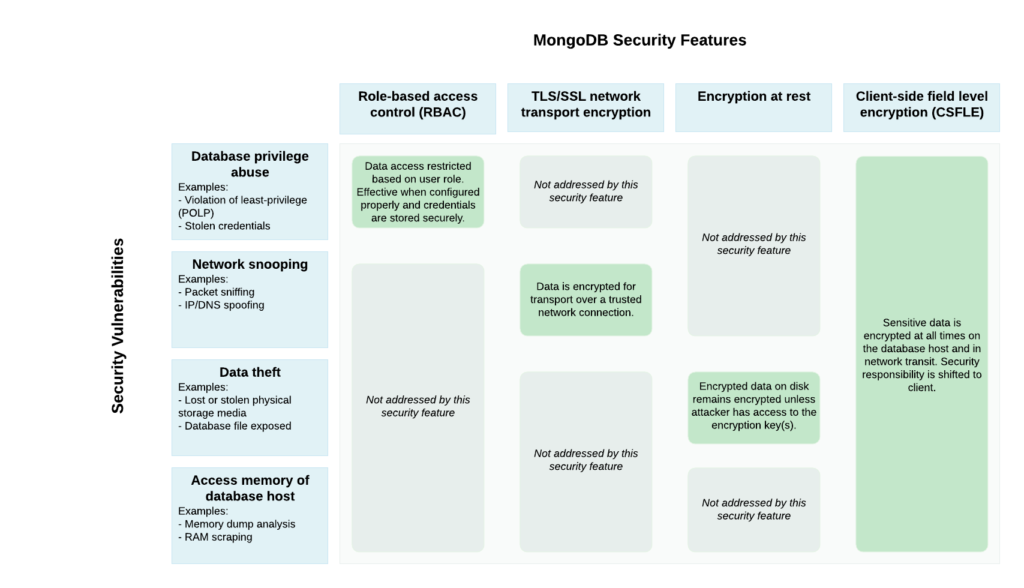
Client-side Field Level Encryption allows the engineers to specify the fields of a document that should be kept encrypted. Sensitive data is transparently encrypted/decrypted by the client and only communicated to and from the server in encrypted form. This mechanism keeps the specified data fields secure in encrypted form on both the server and the network. While all clients have access to the non-sensitive data fields, only appropriately-configured CSFLE clients are able to read and write the sensitive data fields.
In this post, we will design a Node.js client that could be used to safely store select fields as part of a medical application.
MongoDB Client-Side Field Level Encryption (CSFLE) with Node.js Requirements
There are a few requirements that must be met prior to attempting to use Client-Side Field Level Encryption (CSFLE) with the Node.js driver.
- MongoDB Atlas 4.2+ or MongoDB Server 4.2 Enterprise
- MongoDB Node driver 3.6.2+
- The libmongocrypt library installed (macOS installation instructions below)
- The mongocryptd binary installed (macOS installation instructions below)
This tutorial will focus on automatic encryption. While this tutorial will use MongoDB Atlas, you’re going to need to be using version 4.2 or newer for MongoDB Atlas or MongoDB Enterprise Edition. You will not be able to use automatic field level encryption with MongoDB Community Edition.
The assumption is that you’re familiar with developing Node.js applications that use MongoDB. If you want a refresher, take a look at the quick start series that we published on the topic.
Installing the Libmongocrypt and Mongocryptd Binaries and Libraries
Because of the libmongocrypt and mongocryptd requirements, it’s worth reviewing how to install and configure them. We’ll be exploring installation on macOS, but refer to the documentation for libmongocrypt and mongocryptd for your particular operating system.
libmongocrypt
libmongocrypt is required for automatic field level encryption, as it is the component that is responsible for performing the encryption or decryption of the data on the client with the MongoDB 4.2-compatible Node drivers. Now, there are currently a few solutions for installing the libmongocrypt library on macOS. However, the easiest is with Homebrew. If you’ve got Homebrew installed, you can install libmongocrypt with the following command:
brew install mongodb/brew/libmongocryptI ran into an issue with libmongocrypt when I tried to run my code, because libmongocrypt was trying to statically link against libmongocrypt instead of dynamically linking. I have submitted an issue to the team to fix this issue, but to fix it, I had to run:

export BUILD_TYPE=dynamicmongocryptd
mongocryptd is required for automatic field level encryption and is included as a component in the MongoDB Enterprise Server package. mongocryptd is only responsible for supporting automatic client-side field level encryption and does not perform encryption or decryption.
You’ll want to consult the documentation on how to obtain the mongocryptd binary as each operating system has different steps.
For macOS, you’ll want to download MongoDB Enterprise Edition from the MongoDB Download Center. You can refer to the Enterprise Edition installation instructions for macOS to install, but the gist of the installation involves extracting the TAR file and moving the files to the appropriate directory.
By this point, all the appropriate components for client-side field level encryption should be installed or available. Make sure that you are running MongoDB enterprise on your client while using CSFLE, even if you are saving your data to Atlas.
MongoDB Client-Side Field Level Encryption (CSFLE) with Node.js Setup
Let’s start by setting up all the files and dependencies we will need. In a new directory, create the following files, running the following command:
touch clients.js helpers.js make-data-key.jsBe sure to initialize a new NPM project, since we will be using several NPM dependencies.
npm init --yesAnd let’s just go ahead and install all the packages that we will be using now.
npm install -S mongodb mongodb-client-encryption node-gypNote: The complete codebase for this project can be found here: https://github.com/JoeKarlsson/client-side-field-level-encryption-csfle-mongodb-node-demo
Create a Data Key in MongoDB for Encrypting and Decrypting Document Fields
MongoDB Client-Side Field Level Encryption (CSFLE) uses an encryption strategy called envelope encryption in which keys used to encrypt/decrypt data (called data encryption keys) are encrypted with another key (called the master key). The following diagram shows how the master key is created and stored:
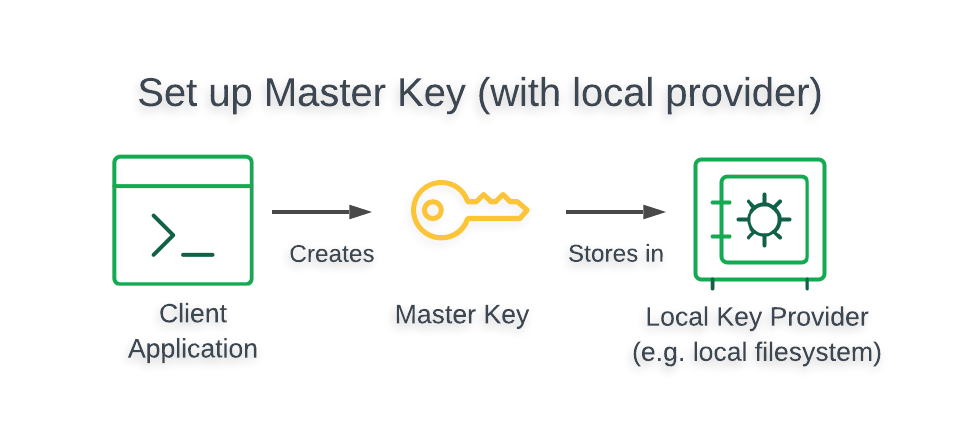
Warning
The Local Key Provider is not suitable for production.
The Local Key Provider is an insecure method of storage and is therefore not recommended if you plan to use CSFLE in production. Instead, you should configure a master key in a Key Management System (KMS) which stores and decrypts your data encryption keys remotely.
To learn how to use a KMS in your CSFLE implementation, read the Client-Side Field Level Encryption: Use a KMS to Store the Master Key guide.
// clients.js

const fs = require("fs")
const mongodb = require("mongodb")
const { ClientEncryption } = require("mongodb-client-encryption")
const { MongoClient, Binary } = mongodb

module.exports = {
readMasterKey: function (path = "./master-key.txt") {
   return fs.readFileSync(path)
},
CsfleHelper: class {
   constructor({
      kmsProviders = null,
      keyAltNames = "demo-data-key",
      keyDB = "encryption",
      keyColl = "__keyVault",
      schema = null,
      connectionString = "mongodb://localhost:27017",
      mongocryptdBypassSpawn = false,
      mongocryptdSpawnPath = "mongocryptd"
   } = {}) {
      if (kmsProviders === null) {
      throw new Error("kmsProviders is required")
      }
      this.kmsProviders = kmsProviders
      this.keyAltNames = keyAltNames
      this.keyDB = keyDB
      this.keyColl = keyColl
      this.keyVaultNamespace = `${keyDB}.${keyColl}`
      this.schema = schema
      this.connectionString = connectionString
      this.mongocryptdBypassSpawn = mongocryptdBypassSpawn
      this.mongocryptdSpawnPath = mongocryptdSpawnPath
      this.regularClient = null
      this.csfleClient = null
   }

   /**
   * In the guide, https://docs.mongodb.com/ecosystem/use-cases/client-side-field-level-encryption-guide/,
   * we create the data key and then show that it is created by
   * retreiving it using a findOne query. Here, in implementation, we only
   * create the key if it doesn't already exist, ensuring we only have one
   * local data key.
   *
   * @param {MongoClient} client
   */
   async findOrCreateDataKey(client) {
      const encryption = new ClientEncryption(client, {
      keyVaultNamespace: this.keyVaultNamespace,
      kmsProviders: this.kmsProviders
      })

      await this.ensureUniqueIndexOnKeyVault(client)

      let dataKey = await client
      .db(this.keyDB)
      .collection(this.keyColl)
      .findOne({ keyAltNames: { $in: [this.keyAltNames] } })

      if (dataKey === null) {
      dataKey = await encryption.createDataKey("local", {
         keyAltNames: [this.keyAltNames]
      })
      return dataKey.toString("base64")
      }

      return dataKey["_id"].toString("base64")
   }
}
The following script generates a 96-byte, locally-managed master key and saves it to a file called master-key.txt in the directory from which the script is executed, as well as saving it to our impromptu key management system in Atlas.
// make-data-key.js

const { readMasterKey, CsfleHelper } = require("./helpers");
const { connectionString } = require("./config");

async function main() {
const localMasterKey = readMasterKey()

const csfleHelper = new CsfleHelper({
   kmsProviders: {
      local: {
      key: localMasterKey
      }
   },
   connectionString: "PASTE YOUR MONGODB ATLAS URI HERE"
})

const client = await csfleHelper.getRegularClient()

const dataKey = await csfleHelper.findOrCreateDataKey(client)
console.log("Base64 data key. Copy and paste this into clients.js\t", dataKey)

client.close()
}

main().catch(console.dir)
After saving this code, run the following to generate and save our keys.
node make-data-key.jsAnd you should get this output in the terminal. Be sure to save this key, as we will be using it in our next step.

It’s also a good idea to check in to make sure that this data has been saved correctly. Go to your clusters in Atlas, and navigate to your collections. You should see a new key saved in the encryption.__keyVault collection.
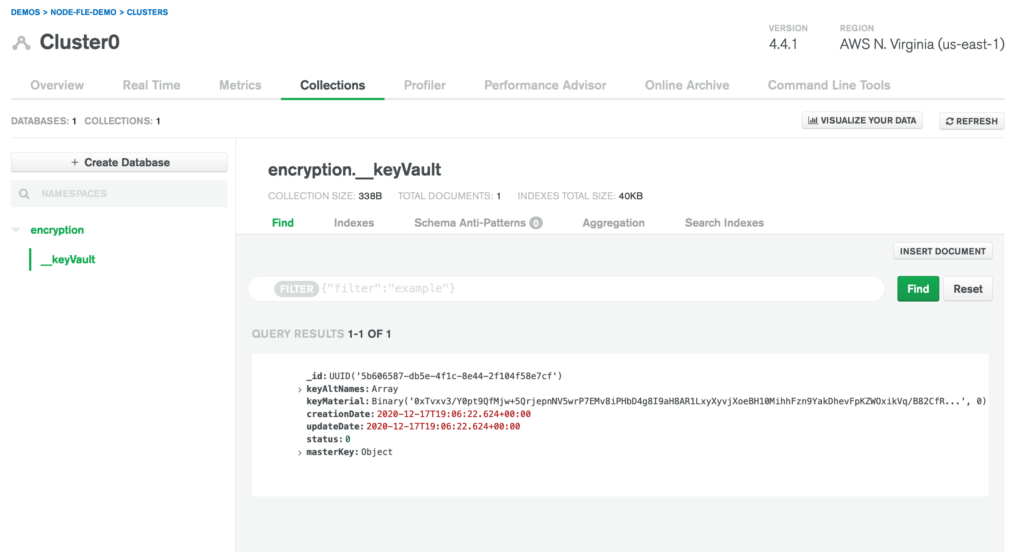
Your key should be shaped like this:
{
   "_id": "UUID('27a51d69-809f-4cb9-ae15-d63f7eab1585')",
   "keyAltNames": ["demo-data-key"],
   "keyMaterial": "Binary('oJ6lEzjIEskH...', 0)",
   "creationDate": "2020-11-05T23:32:26.466+00:00",
   "updateDate": "2020-11-05T23:32:26.466+00:00",
   "status": "0",
   "masterKey": {
      "provider": "local"
   }
}
Defining an Extended JSON Schema Map for Fields to be Encrypted
With the data key created, we’re at a point in time where we need to figure out what fields should be encrypted in a document and what fields should be left as plain text. The easiest way to do this is with a schema map.
A schema map for encryption is extended JSON and can be added directly to the Go source code or loaded from an external file. From a maintenance perspective, loading from an external file is easier to maintain.
The following table illustrates the data model of the Medical Care Management System.
Let’s add a function to our csfleHelper method in helper.js file so our application knows which fields need to be encrypted and decrypted.
if (dataKey === null) {
   throw new Error(
      "dataKey is a required argument. Ensure you've defined it in clients.js"
   )
}
return {
   "medicalRecords.patients": {
      bsonType: "object",
      // specify the encryptMetadata key at the root level of the JSON Schema.
      // As a result, all encrypted fields defined in the properties field of the
      // schema will inherit this encryption key unless specifically overwritten.
      encryptMetadata: {
      keyId: [new Binary(Buffer.from(dataKey, "base64"), 4)]
      },
      properties: {
      insurance: {
         bsonType: "object",
         properties: {
            // The insurance.policyNumber field is embedded inside the insurance
            // field and represents the patient's policy number.
            // This policy number is a distinct and sensitive field.
            policyNumber: {
            encrypt: {
               bsonType: "int",
               algorithm: "AEAD_AES_256_CBC_HMAC_SHA_512-Deterministic"
            }
            }
         }
      },
      // The medicalRecords field is an array that contains a set of medical record documents.
      // Each medical record document represents a separate visit and specifies information
      // about the patient at that that time, such as their blood pressure, weight, and heart rate.
      // This field is sensitive and should be encrypted.
      medicalRecords: {
         encrypt: {
            bsonType: "array",
            algorithm: "AEAD_AES_256_CBC_HMAC_SHA_512-Random"
         }
      },
      // The bloodType field represents the patient's blood type.
      // This field is sensitive and should be encrypted.
      bloodType: {
         encrypt: {
            bsonType: "string",
            algorithm: "AEAD_AES_256_CBC_HMAC_SHA_512-Random"
         }
      },
      // The ssn field represents the patient's
      // social security number. This field is
      // sensitive and should be encrypted.
      ssn: {
         encrypt: {
            bsonType: "int",
            algorithm: "AEAD_AES_256_CBC_HMAC_SHA_512-Deterministic"
         }
      }
   }
}
Create the MongoDB Client
Alright, so now we have the JSON Schema and encryption keys necessary to create a CSFLE-enabled MongoDB client. Let’s recap how our client will work. Our CSFLE-enabled MongoDB client will query our encrypted data, and the mongocryptd process will be automatically started by default. Note: mongocryptd handles the following responsibilities:
- Validates the encryption instructions defined in the JSON Schema and flags the referenced fields for encryption in read and write operations.
- Prevents unsupported operations from being executed on encrypted fields.
To create the CSFLE-enabled client, we need to instantiate a standard MongoDB client object with the additional automatic encryption settings with the following code snippet:
async getCsfleEnabledClient(schemaMap = null) {
   if (schemaMap === null) {
      throw new Error(
         "schemaMap is a required argument. Build it using the CsfleHelper.createJsonSchemaMap method"
      )
   }
   const client = new MongoClient(this.connectionString, {
      useNewUrlParser: true,
      useUnifiedTopology: true,
      monitorCommands: true,
      autoEncryption: {
         // The key vault collection contains the data key that the client uses to encrypt and decrypt fields.
         keyVaultNamespace: this.keyVaultNamespace,
         // The client expects a key management system to store and provide the application's master encryption key.
         // For now, we will use a local master key, so they use the local KMS provider.
         kmsProviders: this.kmsProviders,
         // The JSON Schema that we have defined doesn't explicitly specify the collection to which it applies.
         // To assign the schema, they map it to the medicalRecords.patients collection namespace
         schemaMap
      }
   })
   return await client.connect()
}
If the connection was successful, the client is returned.
Perform Encrypted Read/Write Operations
We now have a CSFLE-enabled client and we can test that the client can perform queries that meet our security requirements.
Insert a Document with Encrypted Fields
The following diagram shows the steps taken by the client application and driver to perform a write of field-level encrypted data:
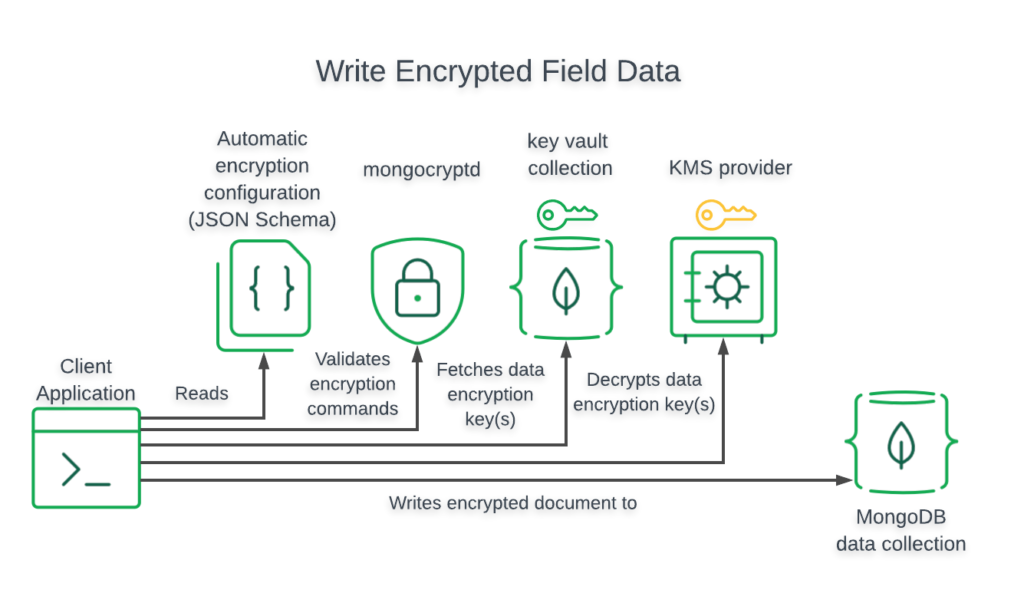
We need to write a function in our clients.js to create a new patient record with the following code snippet:
Note: Clients that do not have CSFLE configured will insert unencrypted data. We recommend using server-side schema validation to enforce encrypted writes for fields that should be encrypted.
const { readMasterKey, CsfleHelper } = require("./helpers");
const { connectionString, dataKey } = require("./config");
const localMasterKey = readMasterKey()
const csfleHelper = new CsfleHelper({
// The client expects a key management system to store and provide the application's master encryption key. For now, we will use a local master key, so they use the local KMS provider.
kmsProviders: {
local: {
key: localMasterKey
}
},
connectionString,
})
async function main() {
let regularClient = await csfleHelper.getRegularClient()
let schemeMap = csfleHelper.createJsonSchemaMap(dataKey)
let csfleClient = await csfleHelper.getCsfleEnabledClient(schemeMap)
let exampleDocument = {
name: "Jon Doe",
ssn: 241014209,
bloodType: "AB+",
medicalRecords: [
{
weight: 180,
bloodPressure: "120/80"
}
],
insurance: {
provider: "MaestCare",
policyNumber: 123142
}
}
const regularClientPatientsColl = regularClient
.db("medicalRecords")
.collection("patients")
const csfleClientPatientsColl = csfleClient
.db("medicalRecords")
.collection("patients")
// Performs the insert operation with the csfle-enabled client
// We're using an update with an upsert so that subsequent runs of this script
// don't insert new documents
await csfleClientPatientsColl.updateOne(
{ ssn: exampleDocument["ssn"] },
{ $set: exampleDocument },
{ upsert: true }
)
// Performs a read using the encrypted client, querying on an encrypted field
const csfleFindResult = await csfleClientPatientsColl.findOne({
ssn: exampleDocument["ssn"]
})
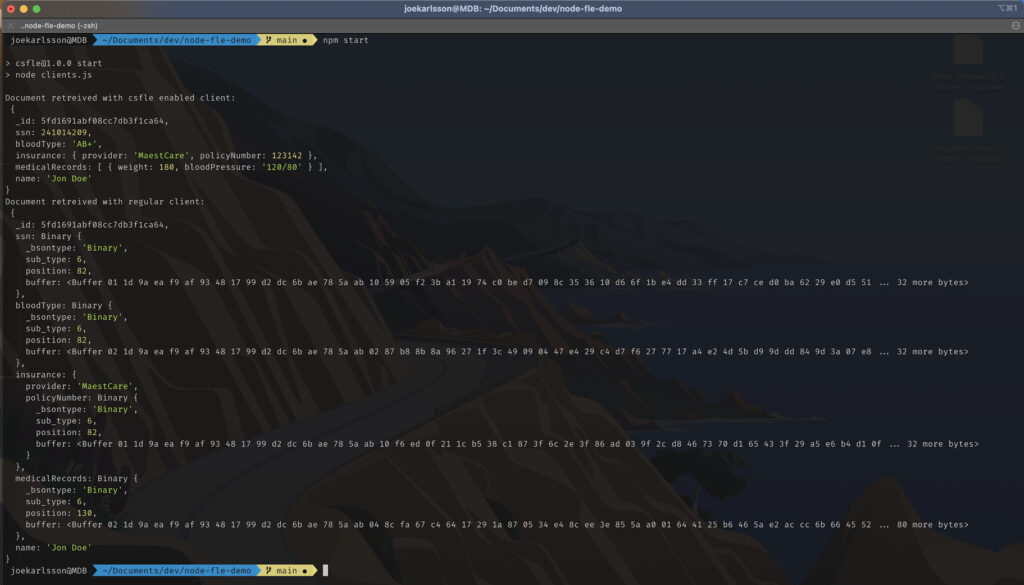
console.log(
"Document retreived with csfle enabled client:\n",
csfleFindResult
)
// Performs a read using the regular client. We must query on a field that is
// not encrypted.
// Try - query on the ssn field. What is returned?
const regularFindResult = await regularClientPatientsColl.findOne({
name: "Jon Doe"
})
console.log("Document retreived with regular client:\n", regularFindResult)
await regularClient.close()
await csfleClient.close()
}
main().catch(console.dir)Query for Documents on a Deterministically Encrypted Field
The following diagram shows the steps taken by the client application and driver to query and decrypt field-level encrypted data:
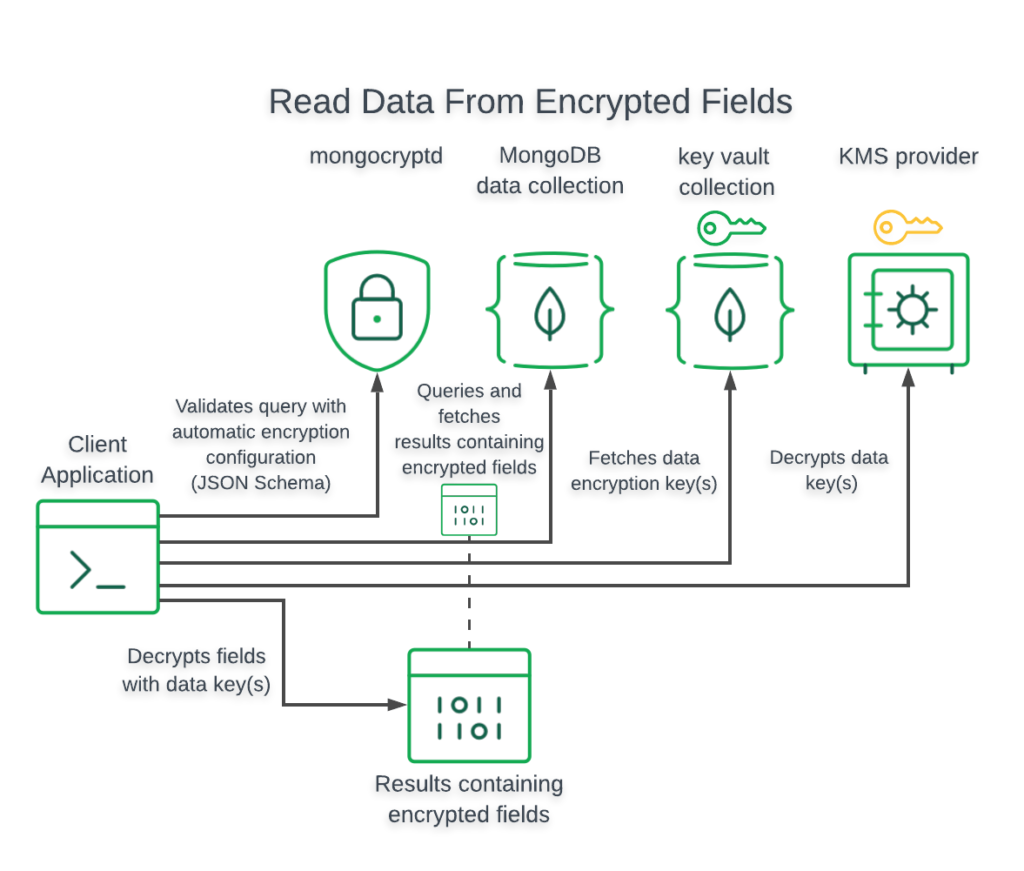
We can run queries on documents with encrypted fields using standard MongoDB driver methods. When a doctor performs a query in the Medical Care Management System to search for a patient by their SSN, the driver decrypts the patient’s data before returning it:
{
   "_id": "5d6ecdce70401f03b27448fc",
   "name": "Jon Doe",
   "ssn": 241014209,
   "bloodType": "AB+",
   "medicalRecords": [
      {
      "weight": 180,
      "bloodPressure": "120/80"
      }
   ],
   "insurance": {
      "provider": "MaestCare",
      "policyNumber": 123142
   }
}
If you attempt to query your data with a MongoDB that isn’t configured with the correct key, this is what you will see:
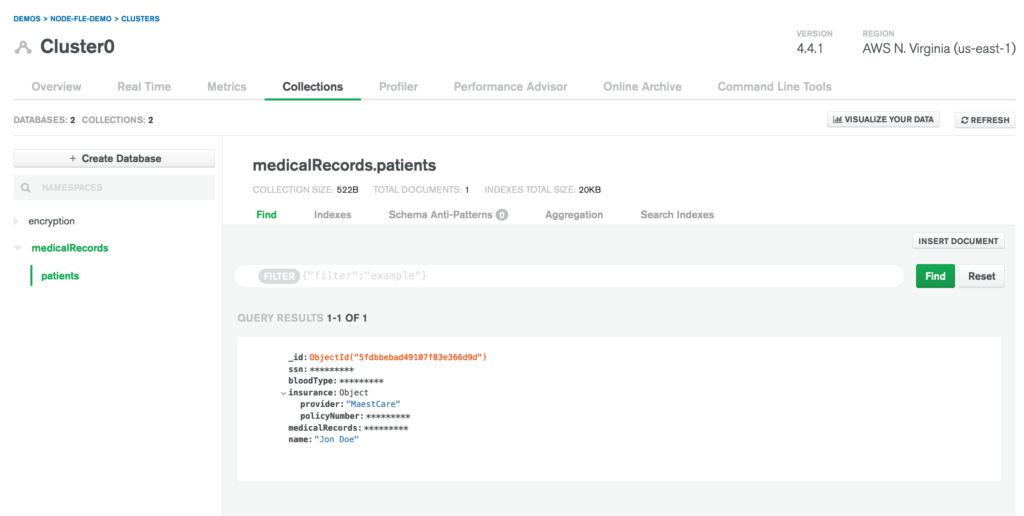
And you should see your data written to your MongoDB Atlas database:
Running in Docker
If you run into any issues running your code locally, I have developed a Docker image that you can use to help you get set up MongoDB Client-Side Field Level Encryption (CSFLE) with Node.js quickly or to troubleshoot local configuration issues. You can download the code here. Make sure you have docker configured locally before you run the code. You can download Docker here.
- Change directories to the Docker directory.
cd docker- Build Docker image with a tag name. Within this directory, execute:
docker build . -t mdb-csfle-exampleThis will build a Docker image with a tag name mdb-csfle-example.
- Run the Docker image by executing:
docker run -tih csfle mdb-csfle-examp4. The command above will run a Docker image with tag mdb-csfle-example and provide it with csfle as its hostname.
Once you’re inside the Docker container, you can follow the below steps to run the NodeJS code example.
$ export MONGODB_URL="mongodb+srv://USER:[email protected]/dbname?retryWrites=true&w=majority"

$ node ./example.js
Note: If you’re connecting to MongoDB Atlas, please make sure to Configure Allowlist Entries.
Summary
We wanted to develop a system that securely stores sensitive medical records for patients using MongoDB Client-Side Field Level Encryption (CSFLE) with Node.js. We also wanted strong data access and security guarantees that do not rely on individual users. After researching the available options, we determined that MongoDB Client-Side Field Level Encryption satisfies their requirements and decided to implement it in their application. To implement CSFLE, we did the following:
1. Created a Locally-Managed Master Encryption Key
A locally-managed master key allowed us to rapidly develop the client application without external dependencies and avoid accidentally leaking sensitive production credentials.
2. Generated an Encrypted Data Key with the Master Key
CSFLE uses envelope encryption, so we generated a data key that encrypts and decrypts each field and then encrypted the data key using a master key. This allows us to store the encrypted data key in MongoDB so that it is shared with all clients while preventing access to clients that don’t have access to the master key.
3. Created a JSON Schema
CSFLE can automatically encrypt and decrypt fields based on a provided JSON Schema that specifies which fields to encrypt and how to encrypt them.
4. Tested and Validated Queries with the CSFLE Client
We tested their CSFLE implementation by inserting and querying documents with encrypted fields. We then validated that clients without CSFLE enabled could not read the encrypted data.
Move to Production
In this guide, we stored the master key in your local file system. Since your data encryption keys would be readable by anyone that gains direct access to your master key, we strongly recommend that you use a more secure storage location such as a Key Management System (KMS).
Further Reading
For more information on MongoDB Client-Side Field Level Encryption (CSFLE) with Node.js, check out the reference docs in the server manual:
- Client-Side Field Level Encryption
- Automatic Encryption JSON Schema Syntax
- Manage Client-Side Encryption Data Keys
- Comparison of Security Features
- For additional information on the MongoDB CSFLE API, see the official Node.js driver documentation
- Questions? Comments? We’d love to connect with you. Join the conversation on the MongoDB Community Forums.
Want to check out more of my technical posts?
- Self-Hosted Music Still Sucks in 2025
- I Replaced Alexa with a Dumber Voice Assistant (But at Least It’s Private)
- Why Clickhouse Should Be Your Next Database
- Data Warehouses Are Terrible Application Backends
Follow Joe Karlsson on Social
- Twitter – https://twitter.com/JoeKarlsson1
- TikTok – https://www.tiktok.com/@joekarlsson
- GitHub – https://github.com/JoeKarlsson
- YouTube – https://www.youtube.com/c/JoeKarlsson
- Twitch – https://www.twitch.tv/joe_karlsson
- Medium – https://medium.com/@joekarlsson
- LinkedIn – https://www.linkedin.com/in/joekarlsson/
- Reddit – www.reddit.com/user/joekarlsson
- Instagram – https://www.instagram.com/joekarlsson/