Have you ever wanted to build a Spotify player for your app or website? Adding personalized music to any application is super easy with the Spotify Developer API. Personally, I have been playing around with the Spotify API with an IoT project I have been building in my free time.
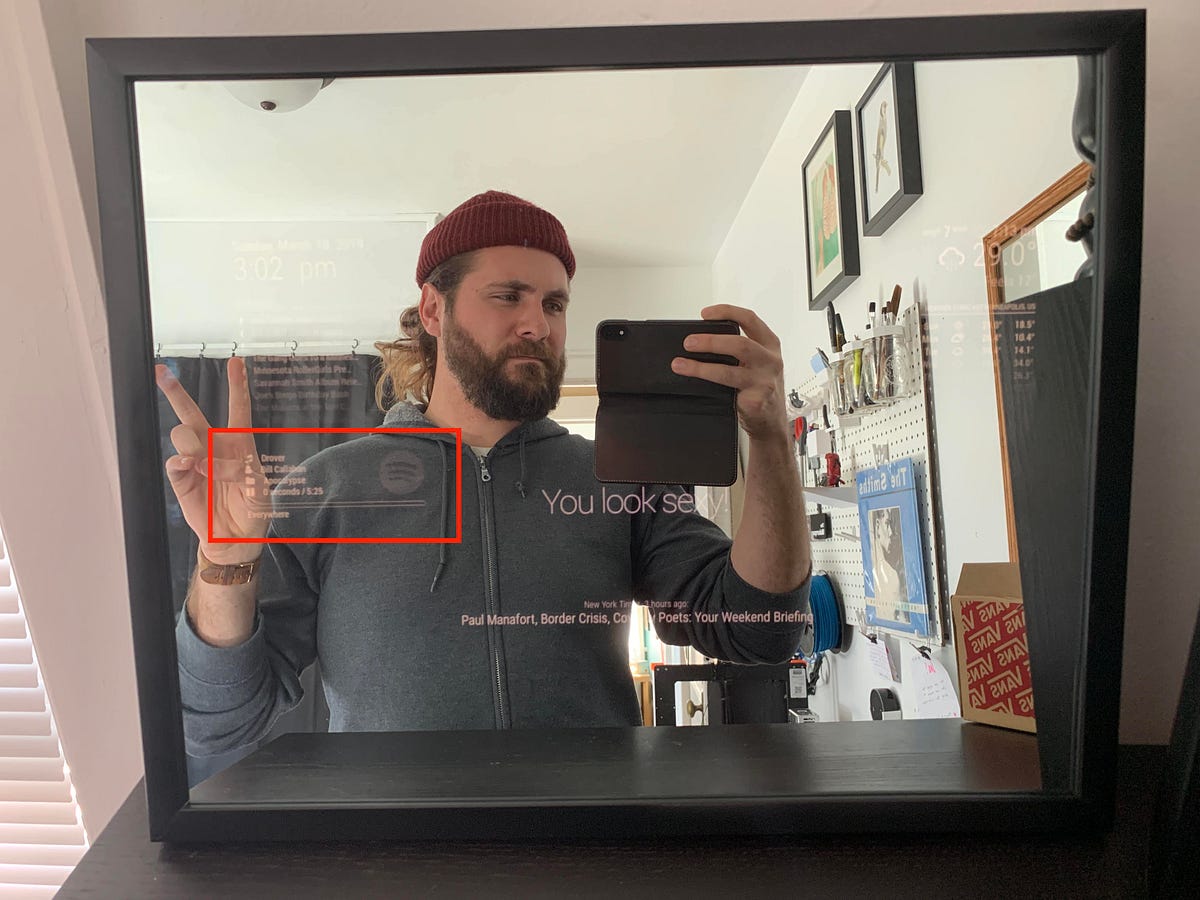
The Spotify API is easy to use and can be added to any application.
In this post, I am going to walk through how to access the Spotify Developer API in the browser using React. The goal is to be a starting point for front-end devs who want to get set up with Spotify API as quickly as possible. Together, we will be creating a Spotify Web player that displays information about your currently played music from Spotify. We will also demonstrate how to:
- Register an application with Spotify
- Authenticate a user and get authorization to access user data
- Retrieve the data from a Web API endpoint
You can find all of the source code here:
Note: This article will not be a deep dive into React, and it will require knowledge of the basics of JavaScript and React.

Set Up Your Account
To use the Web API, start by creating a Spotify user account (Premium or Free). To do that, simply sign up at www.spotify.com.
When you have a user account, go to the Dashboard page at the Spotify Developer website and, if necessary, log in. Accept the latest Developer Terms of Service to complete your account setup.
Register Your Application
Any application can request data from Spotify Web API endpoints and many endpoints are open and will return data without requiring registration. However, if your application seeks access to a user’s personal data (profile, playlists, etc.) it must be registered.
You can register your application, even before you have created it.
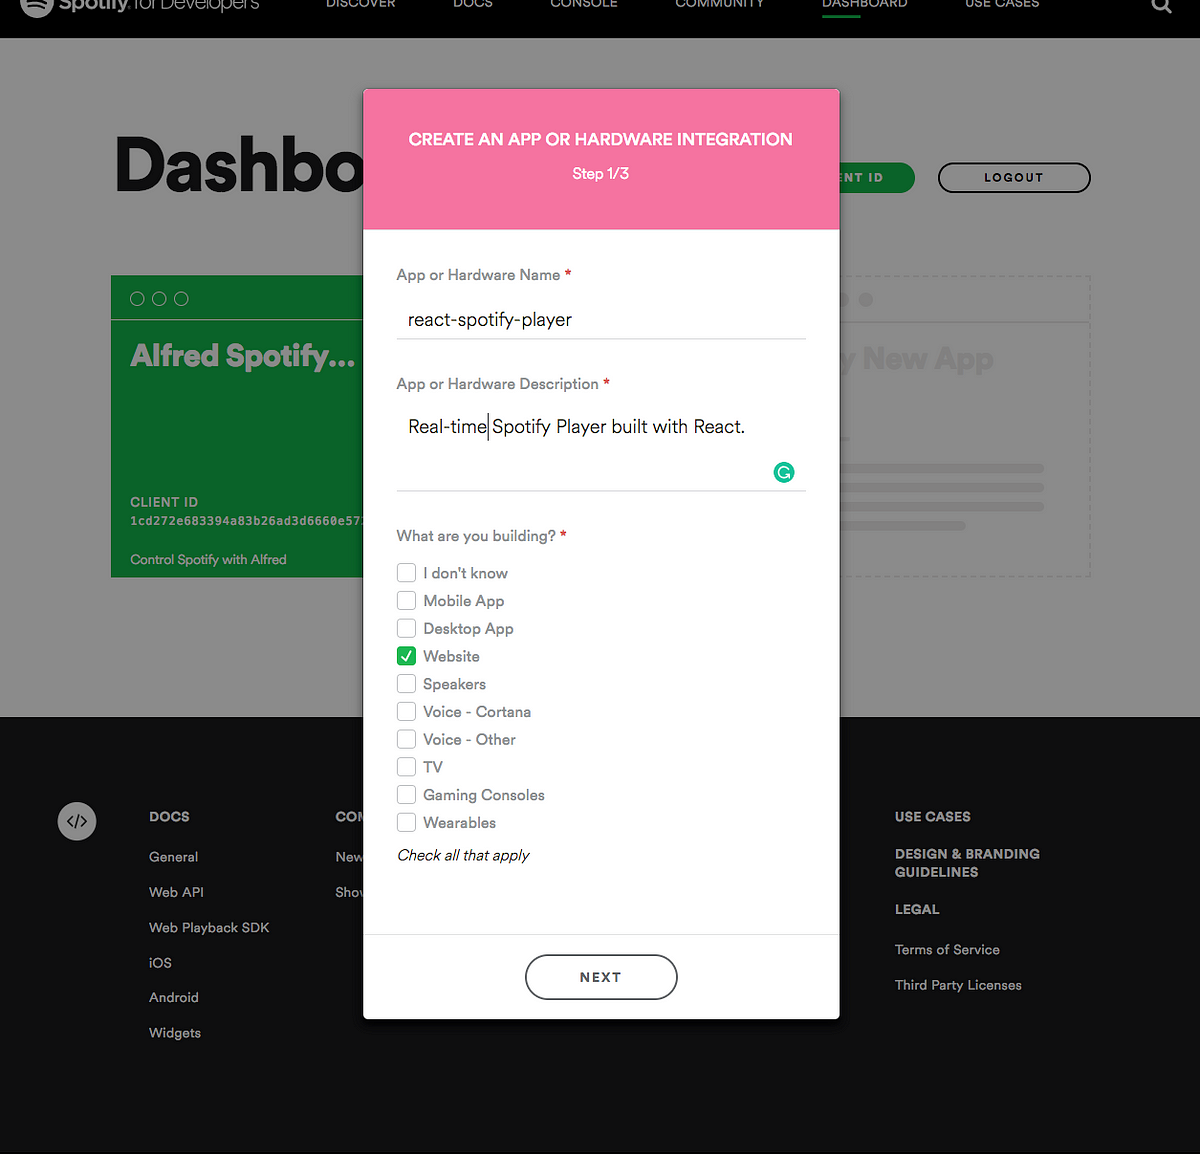
Go to the Dashboard page at the Spotify Developer website, and click on ‘My New App.”
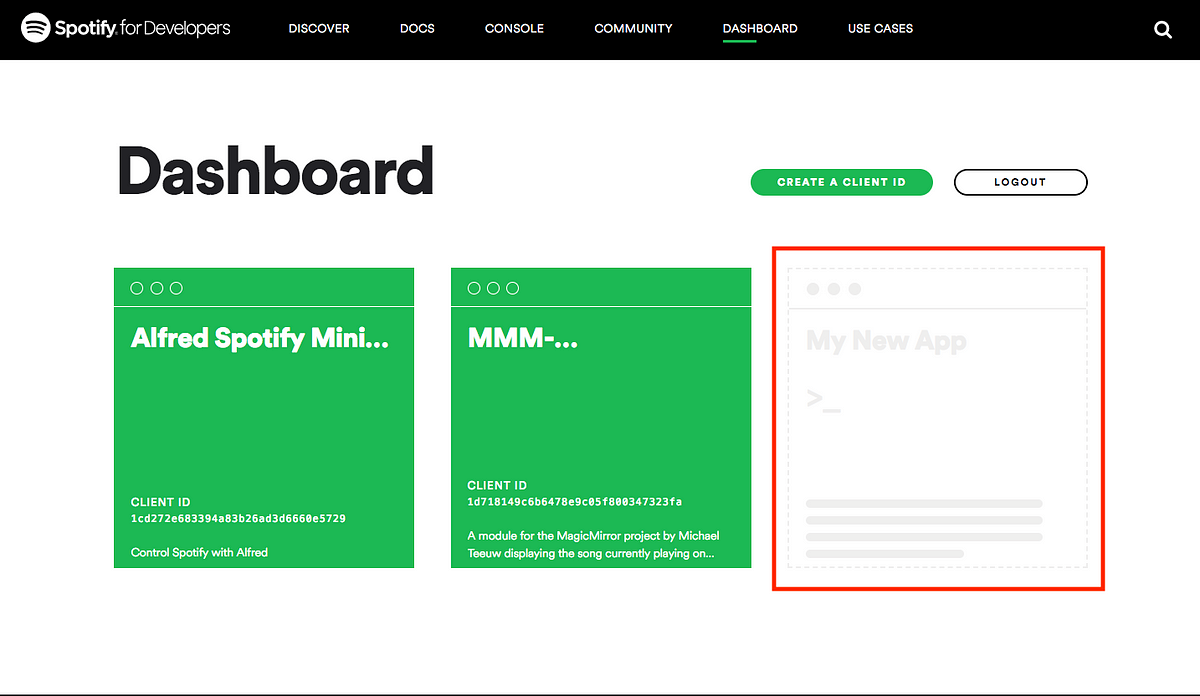
Fill out the information for your new app using the form as a guide. Then click Next.
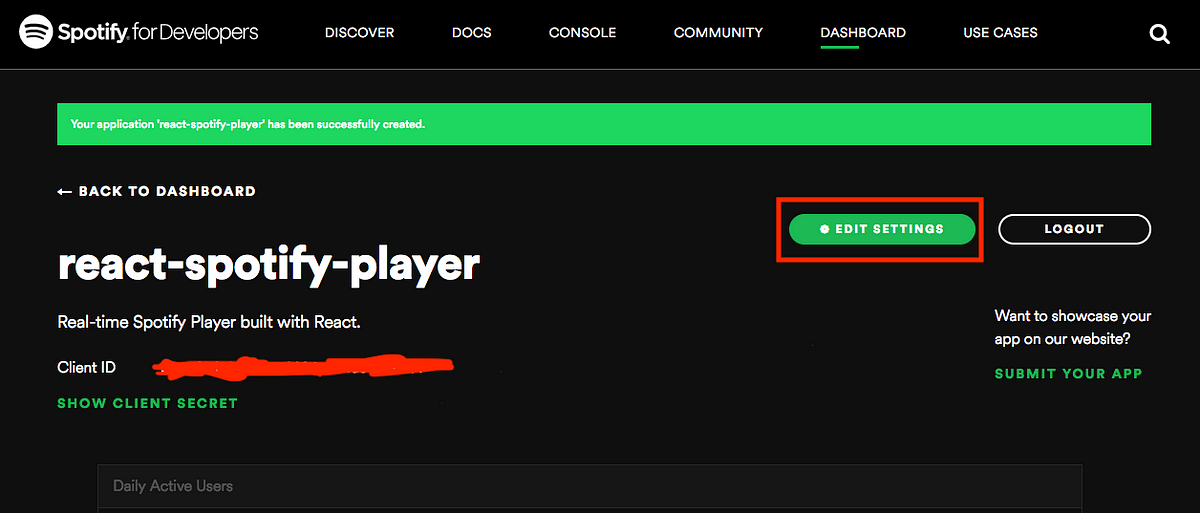
Click on Edit Settings to continue your app registration.
The most important thing is that you must put in a redirect URL. We are going to use the default URL of from the Create React App. Enter http://localhost:3000 in this field. This is the URL you want to be redirected to after a user has authenticated through Spotify.
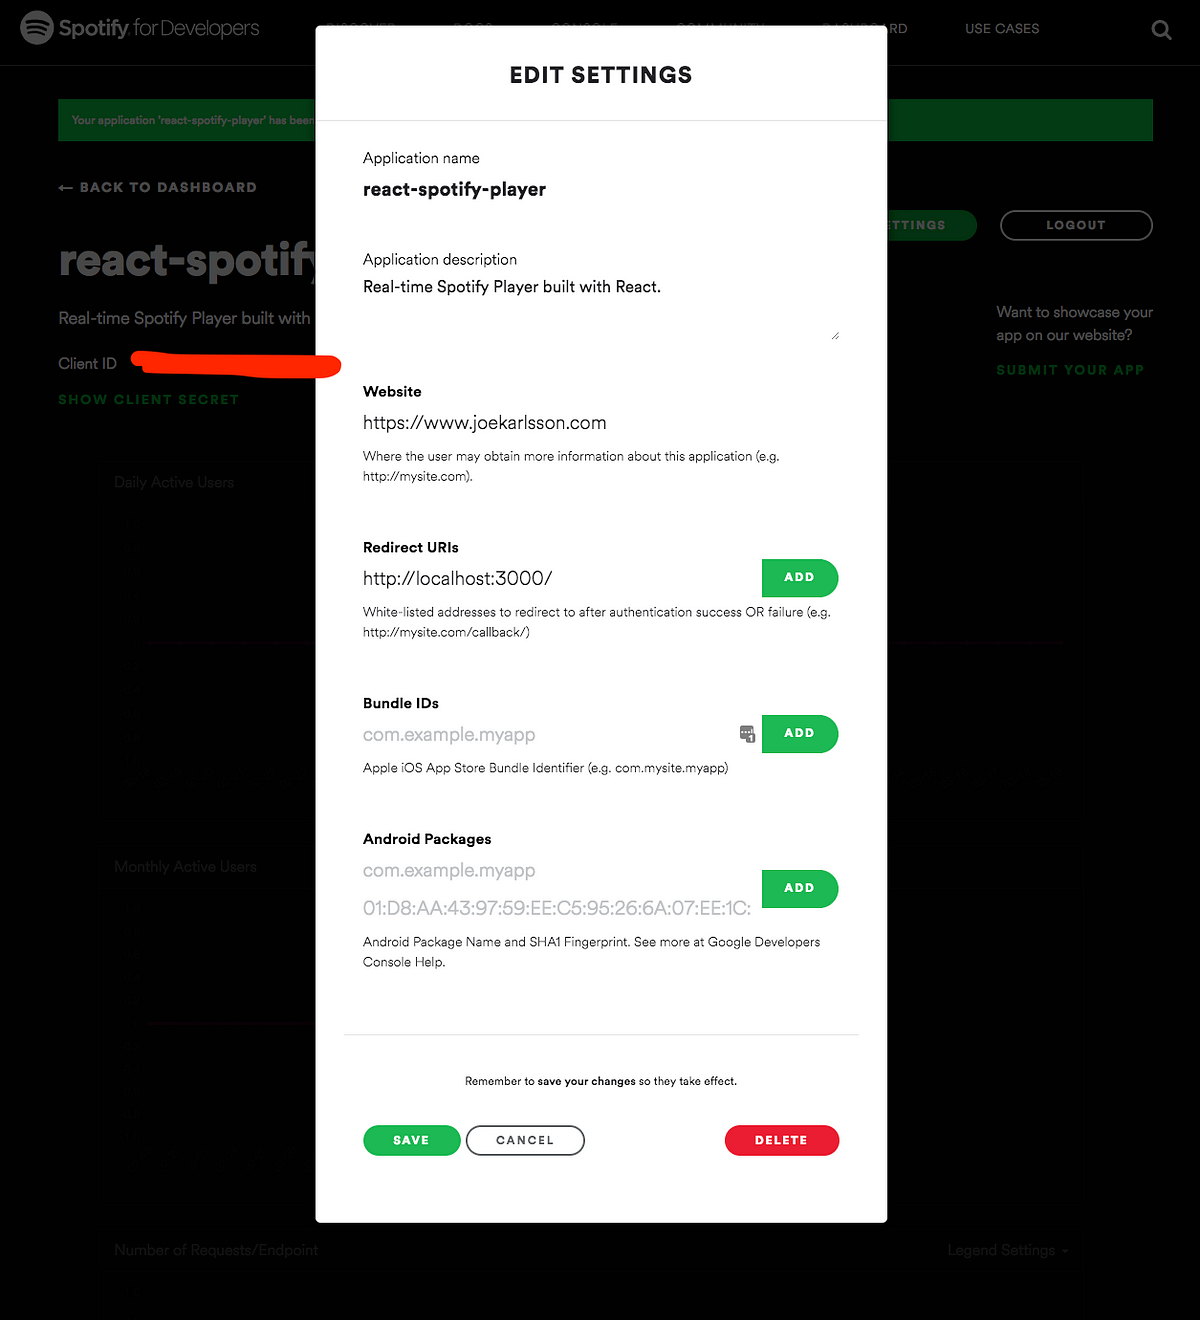
Click “Save” and be sure to write down the Client ID from your application. And congrats, you’ve just registered your application and now we are ready to jump into the code.

Setting Up The Code
We are going to get started quickly by running Create React App. You can do this by running the following commands in your terminal.
npx create-react-app react-spotify-player
cd react-spotify-player
npm start
Open up the project in your favorite text editor and then let’s get our app authenticated to Spotify so we can get that juicy data. There are many ways to authenticate to Spotify, but we are going to use Implicit authorization.
Implicit grant flow is for clients (Like ours) that are implemented entirely using JavaScript and running in the resource owner’s browser. Implicit Grant flow is carried out client-side and does not involve secret keys. The access tokens that are issued are short-lived and there are no refresh tokens to extend them when they expire.
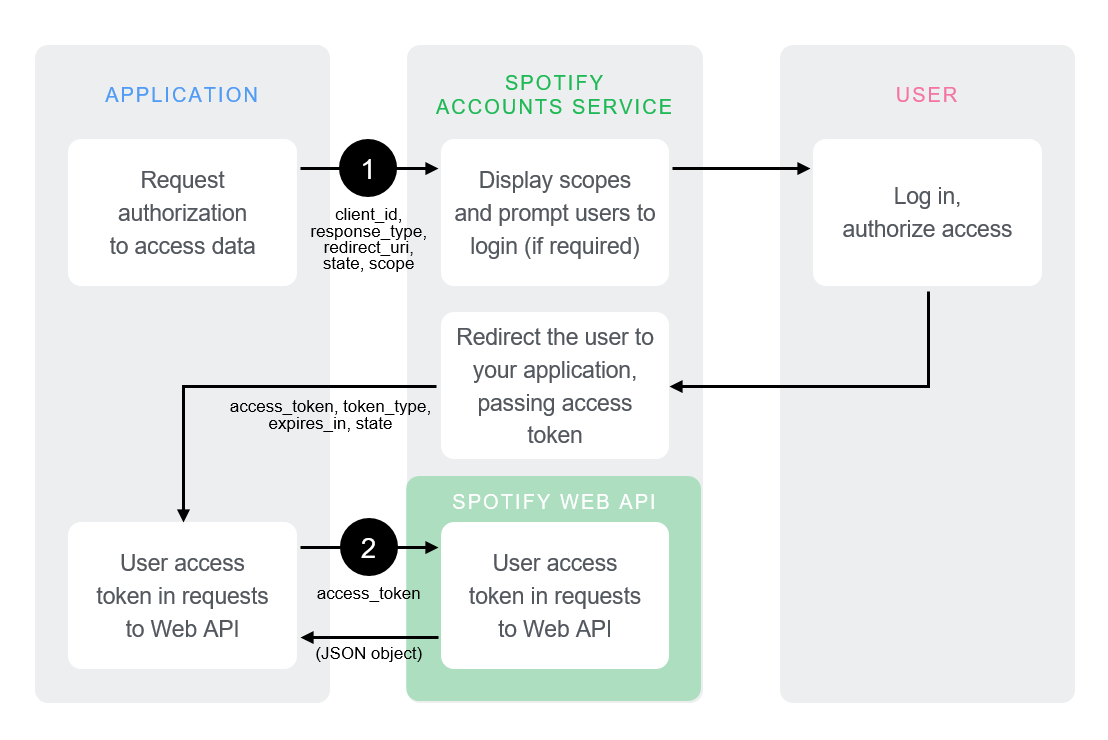
We need to write some code that performs a couple of actions:
- We will redirect the user to the
/authorizeendpoint of the Accounts service:
GET https://accounts.spotify.com/authorize
2. The user is asked to authorize access within the scopes. The Spotify Accounts service presents details of the scopes for which access is being sought.
- If the user is not logged in, they are prompted to do so using their Spotify username and password.
- When the user is logged in, they are asked to authorize access to the data sets defined in the scopes.
3. The user is redirected back to your specified URI. After the user grants (or denies) access, the Spotify Accounts service redirects the user to the redirect_uri. In this example, the redirect address is: https://example.com/callback
In App.js add the following code:
import React, { Component } from "react";
import hash from "./hash";
import logo from "./logo.svg";
import "./App.css";

export const authEndpoint = 'https://accounts.spotify.com/authorize';

// Replace with your app's client ID, redirect URI and desired scopes
const clientId = "YOUR_CLIENT_ID_GOES_HERE";
const redirectUri = "http://localhost:3000";
const scopes = [
  "user-read-currently-playing",
  "user-read-playback-state",
];

// Get the hash of the url
const hash = window.location.hash
  .substring(1)
  .split("&")
  .reduce(function(initial, item) {
    if (item) {
      var parts = item.split("=");
      initial[parts[0]] = decodeURIComponent(parts[1]);
    }
    return initial;
  }, {});

window.location.hash = "";

class App extends Component {
  componentDidMount() {
    // Set token
    let _token = hash.access_token;
    if (_token) {
      // Set token
      this.setState({
        token: _token
      });
    }
  }

render() {
  return (
    <div className="App">
      <header className="App-header">
      <img src={logo} className="App-logo" alt="logo" />
      {!this.state.token && (
        <a
          className="btn btn--loginApp-link"
          href={`${authEndpoint}client_id=${clientId}&redirect_uri=${redirectUri}&scope=${scopes.join("%20")}&response_type=token&show_dialog=true`}
        >
          Login to Spotify
        </a>
      )}
      {this.state.token && (
        // Spotify Player Will Go Here In the Next Step
      )}
      </header>
    </div>
  );
  }
}

export default App;
This code snippet creates a “Login With Spotify” button that redirects the user to authenticate with Spotify, we can obtain an Auth token that we will then use to make a request to the Spotify API.
Now, let’s add a function that will call the Spotify API and return the data. You will need to add the additional info.
import * as $ from "jquery";
import Player from "./Player";

class App extends Component {
  constructor() {
    super();
    this.state = {
      token: null,
    item: {
      album: {
        images: [{ url: "" }]
      },
      name: "",
      artists: [{ name: "" }],
      duration_ms:0,
    },
    is_playing: "Paused",
    progress_ms: 0
  };

  this.getCurrentlyPlaying = this.getCurrentlyPlaying.bind(this);
  }

  getCurrentlyPlaying(token) {
    // Make a call using the token
    $.ajax({
      url: "https://api.spotify.com/v1/me/player",
      type: "GET",
      beforeSend: (xhr) => {
        xhr.setRequestHeader("Authorization", "Bearer " + token);
      },
      success: (data) => {
        this.setState({
          item: data.item,
          is_playing: data.is_playing,
          progress_ms: data.progress_ms,
        });
      }
    });
  }

  ...

}
Then, of course, we need to make the actual player. We will first need to create a new Player component called Player.js .
import React from "react";
import "./Player.css";

const Player = props => {
  const backgroundStyles = {
    backgroundImage:`url(${props.item.album.images[0].url})`,
  };

  const progressBarStyles = {
    width: (props.progress_ms * 100 / props.item.duration_ms) + '%'
  };

  return (
    <div className="App">
      <div className="main-wrapper">
        <div className="now-playing__img">
          <img src={props.item.album.images[0].url} />
        </div>
        <div className="now-playing__side">
          <div className="now-playing__name">{props.item.name}</div>
          <div className="now-playing__artist">
            {props.item.artists[0].name}
          </div>
          <div className="now-playing__status">
            {props.is_playing ? "Playing" : "Paused"}
          </div>
          <div className="progress">
            <div
              className="progress__bar"
              style={progressBarStyles}
            />
          </div>
        </div>
        <div className="background" style={backgroundStyles} />{" "}
      </div>
    </div>
  );
}

export default Player;
Here’s the CSS for Player.css .
/** Now Playing **/
.now-playing__name {
  font-size: 1.5em;
  margin-bottom: 0.2em;
}

.now-playing__artist {
  margin-bottom: 1em;
}

.now-playing__status {
  margin-bottom: 1em;
}

.now-playing__img {
  float: left;
  margin-right: 10px;
  text-align: right;
  width: 45%;
}

.now-playing__img img {
  max-width: 80vmin;
  width: 100%;
}

.now-playing__side {
  margin-left: 5%;
  width: 45%;
}

/** Progress **/
.progress {
  border: 1px solid #eee;
  height: 6px;
  border-radius: 3px;
  overflow: hidden;
}

.progress__bar {
  background-color: #eee;
  height: 4px;
}
Then in your App.js you will need to pass in the data from Spotify to your Player component.
class App extends Component {

  ...

  render() {
    return (

   ...

      {this.state.token && (
        <Player
          item={this.state.item}
          is_playing={this.state.is_playing}
          progress_ms={this.progress_ms}
        />
      )}
     </header>
   </div>
  );
 }
}
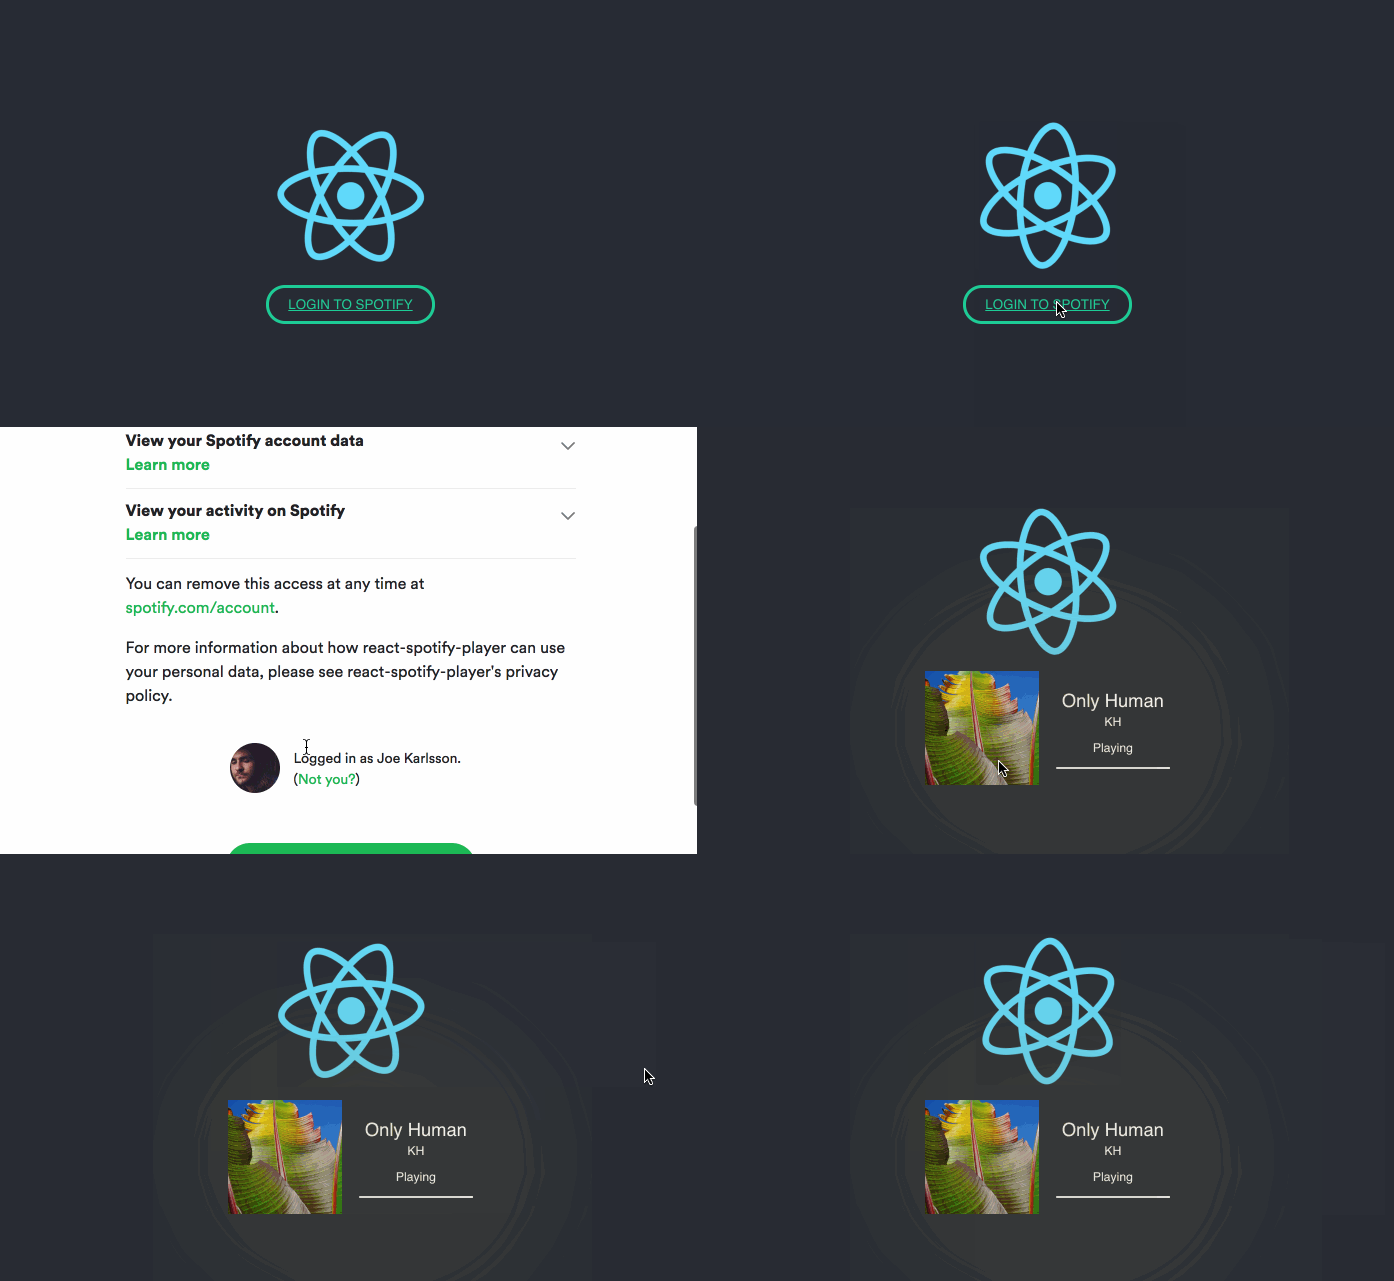
And that’s all the code you’ll need. By this step, your app should look and work like this.

And that’s it!

If you have any questions or comments, feel free to reach out or open an issue in the repo.
You can find the source code for this tutorial here: https://github.com/JoeKarlsson/react-spotify-player

