Are you interested in learning how to build a React and MongoDB App? Like many of you, I have been interested in learning more about MongoDB’s cloud offerings and also not spending a dime. This guide is for the developer who only has 10 minutes to spare and who wants to learn a brand new tool from MongoDB.

Okay, first of all, what is MongoDB Stitch? Well…
MongoDB Stitch is a cross-platform application on top of MongoDB. Stitch removes the need for tedious boilerplate when setting up a new app and automatically manages your app’s backend so you can focus on building what matters.

Setup MongoDB Atlas
Now that we have got that out of the way, let’s see if we can set up a new app in record time. For this tutorial, we will be setting up a to-do app.
Note: This tutorial does not touch all of the features of Stitch, it is intended to be a quickest possible way to explore the platform.
You can find the source code for this tutorial here: https://github.com/JoeKarlsson/mongodb-stitch-todo-tutorial
- First things first, you will need to set up a MongoDB Atlas account.
For additional information on setting up an Atlas account, check out the MongoDB Atlas Creating an Atlas User Account guide.
- You will also need to set up a MongoDB cluster hosted on Atlas.
You can create an M0 Atlas cluster for free. No credit card is required to get started.
To get up and running with a free M0 cluster, follow the MongoDB Atlas Getting Started guide.
- Once you have initialized your new Atlas account and set up your free Atlas cluster, you will have to create a new Stitch Application.
- First of all, make sure you are logged into MongoDb Atlas.
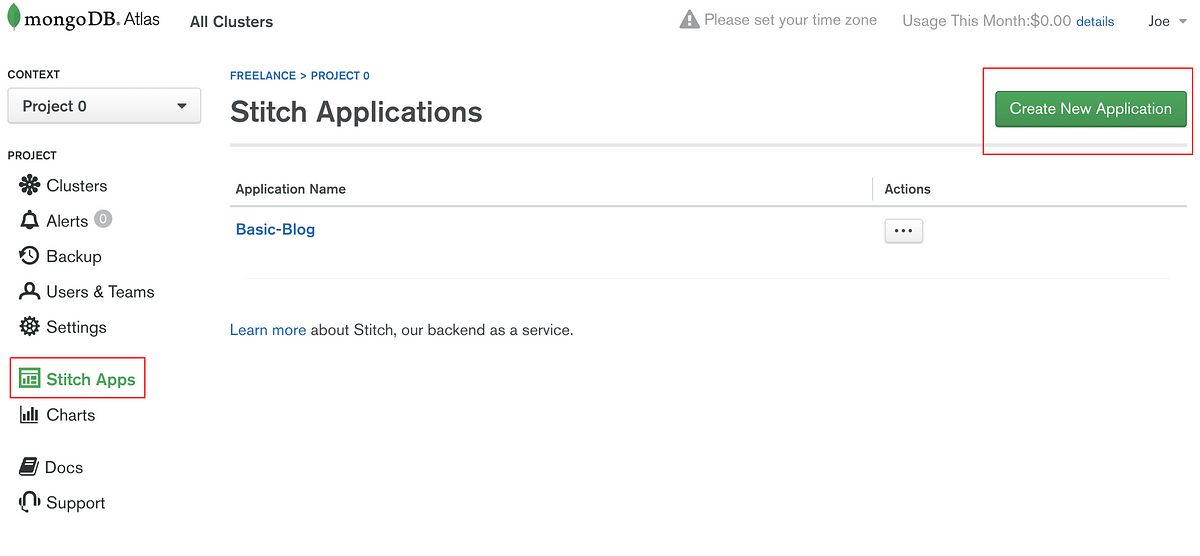
- Click Stitch Apps in the left-hand navigation of the MongoDB Atlas console.

- Click Create New Application.
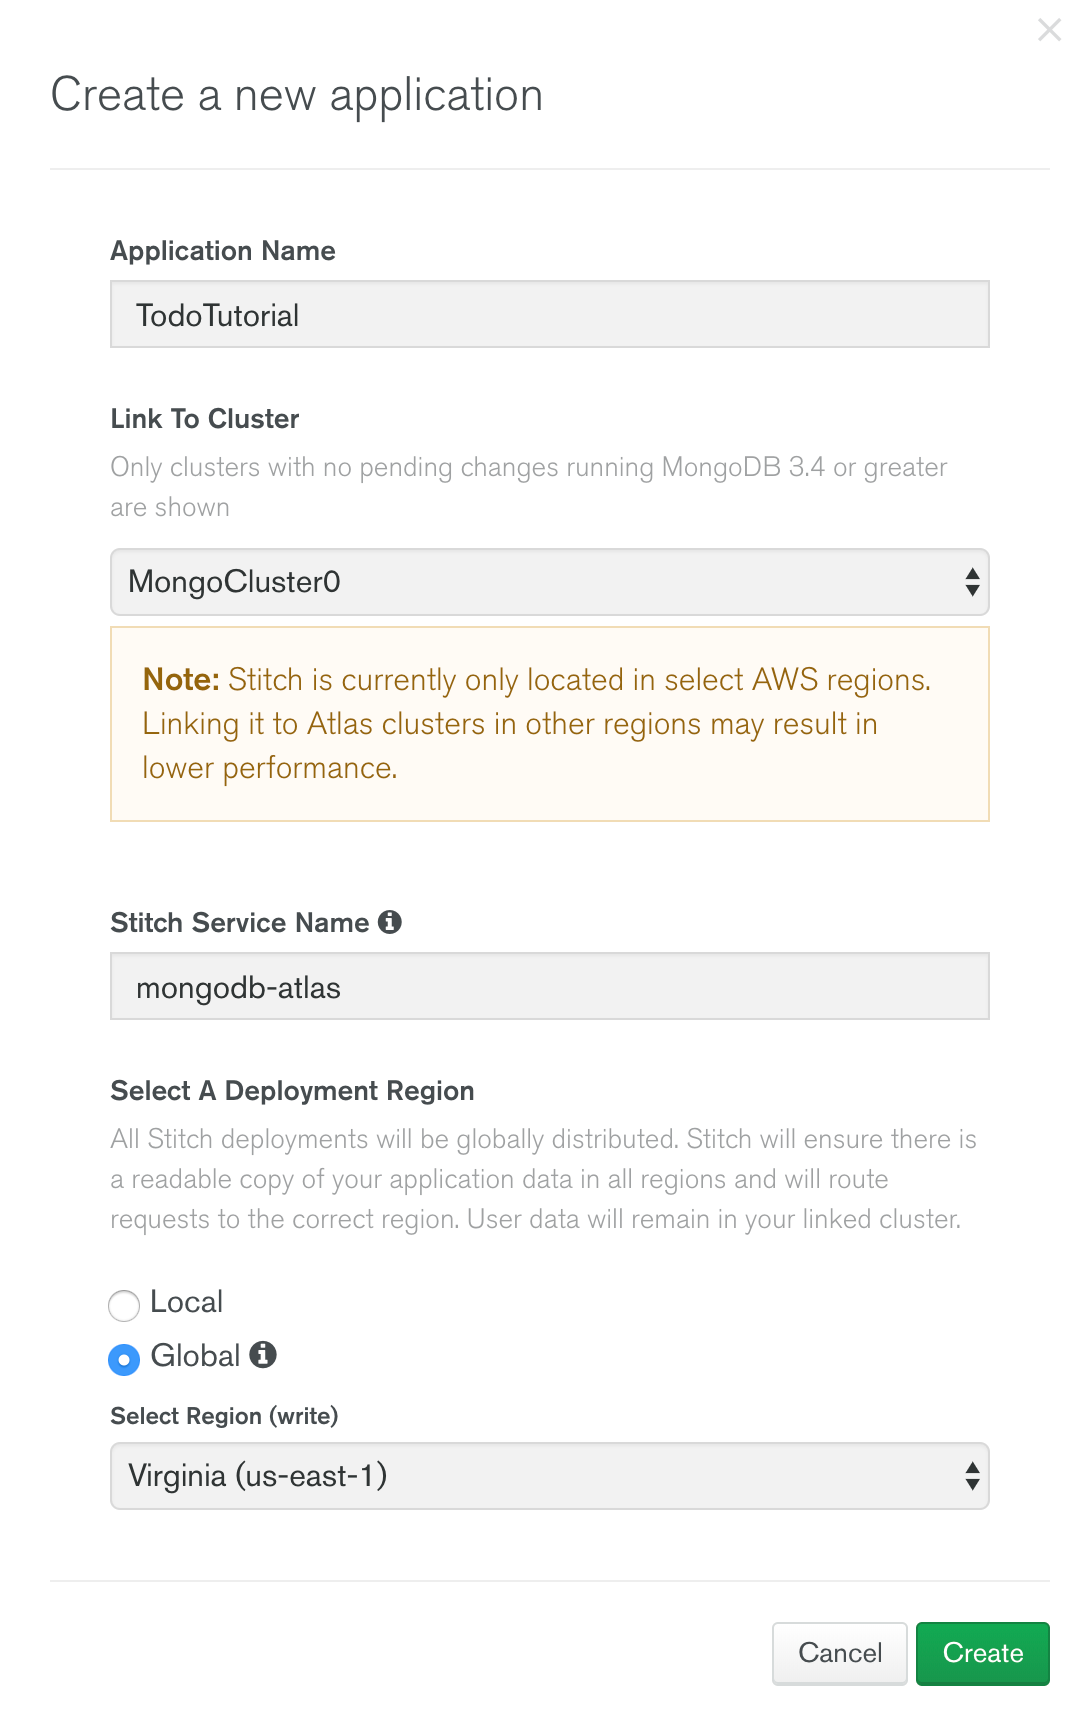
- Give the application a name (e.g. TodoTutorial) and click Create.
Authentication
Wait for your application to initialize. Upon creation of your app, you will be redirected to the Stitch UI.
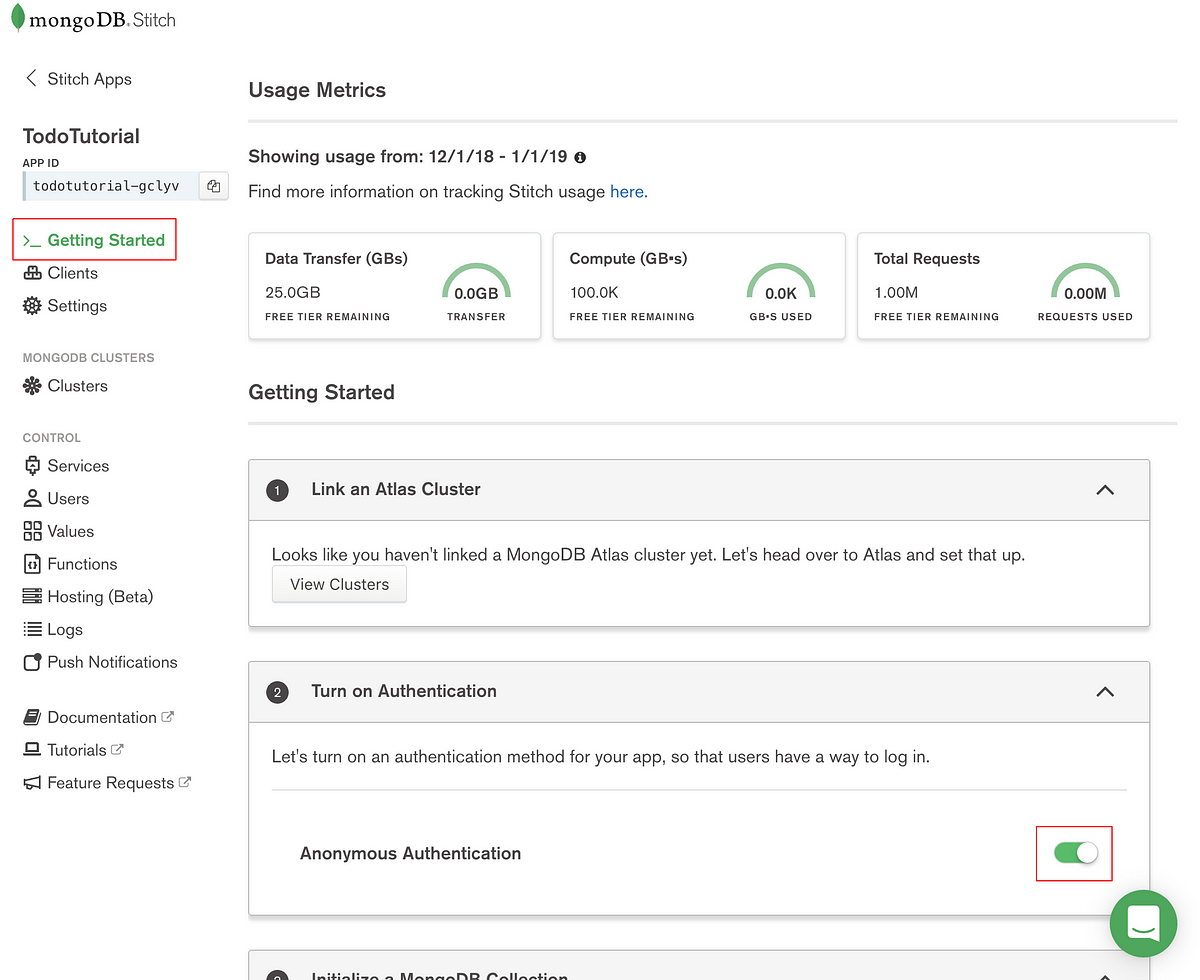
Once, your app has been initialized, you will need to turn on Anonymous Authentication.
Note: MongoDB and Atlas come secure by default, this is why we need to do this step.

- From the Getting Started page of the Stitch UI, enable Anonymous Authentication under the Turn On Authentication heading.
- Next, we will need to configure rules for the
todocollection before Stitch will allow users to query it. To configure the collection:
- Click Rules under MongoDB Atlas in the left-hand navigation of the Stitch UI.
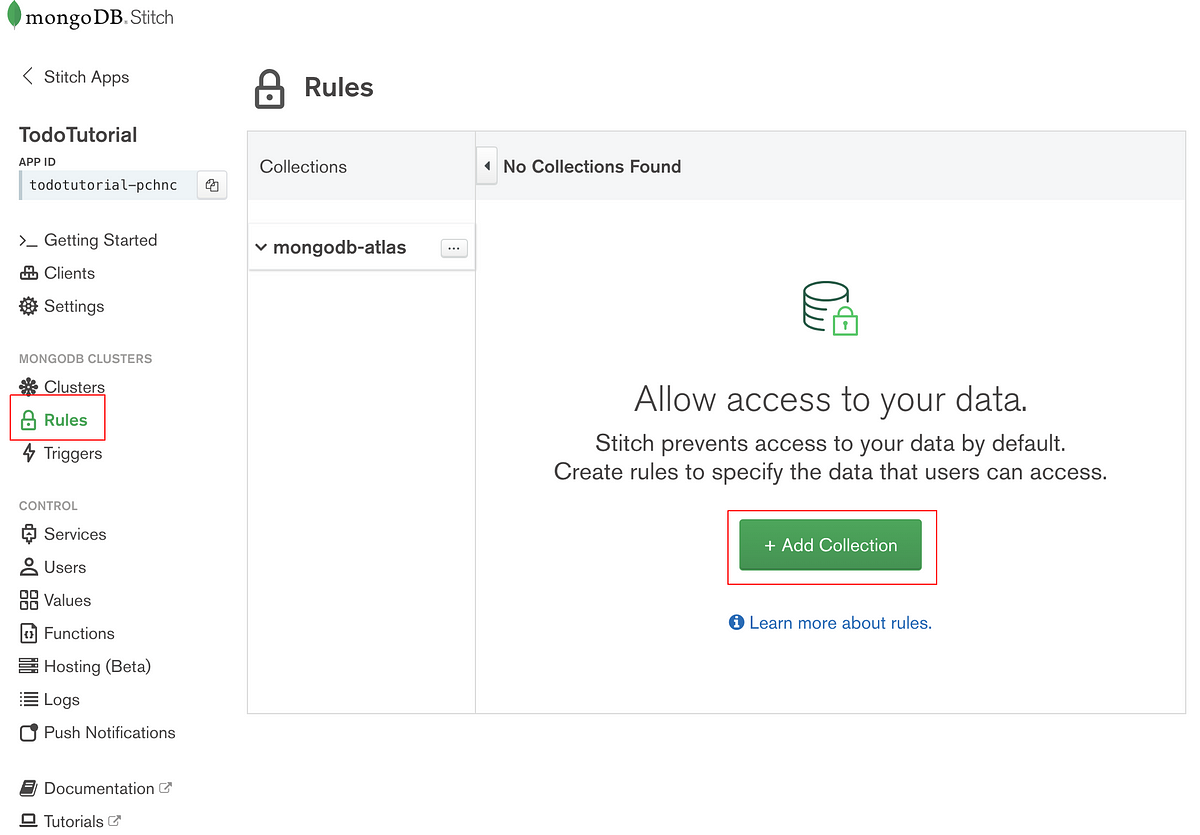
Click Add Collection.
Enter todos for the Database Name. Enter item for the Collection Name and Select No Template. Then click Add Collection.
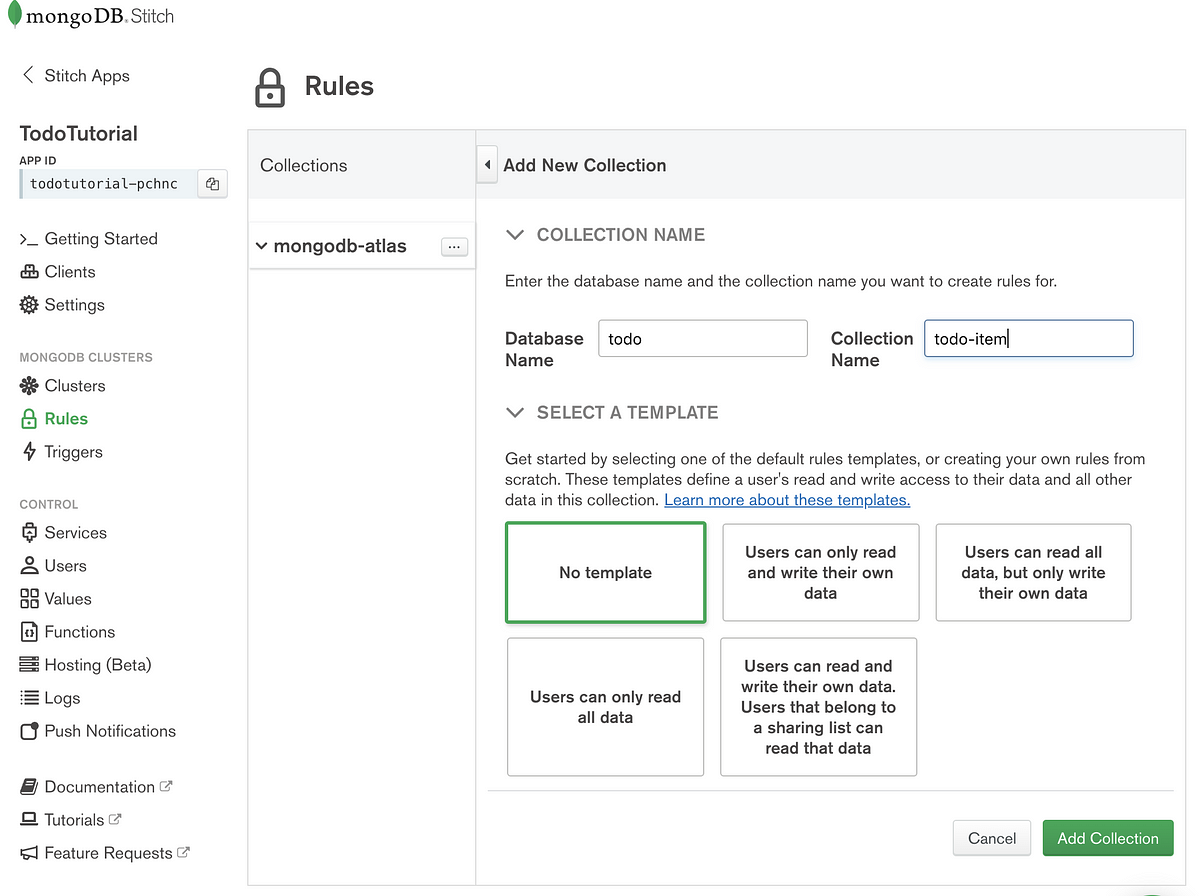
You should now see the Permissions tab of the rules for the itemcollection, and the default role doesn’t allow any user to read or write to the collection.
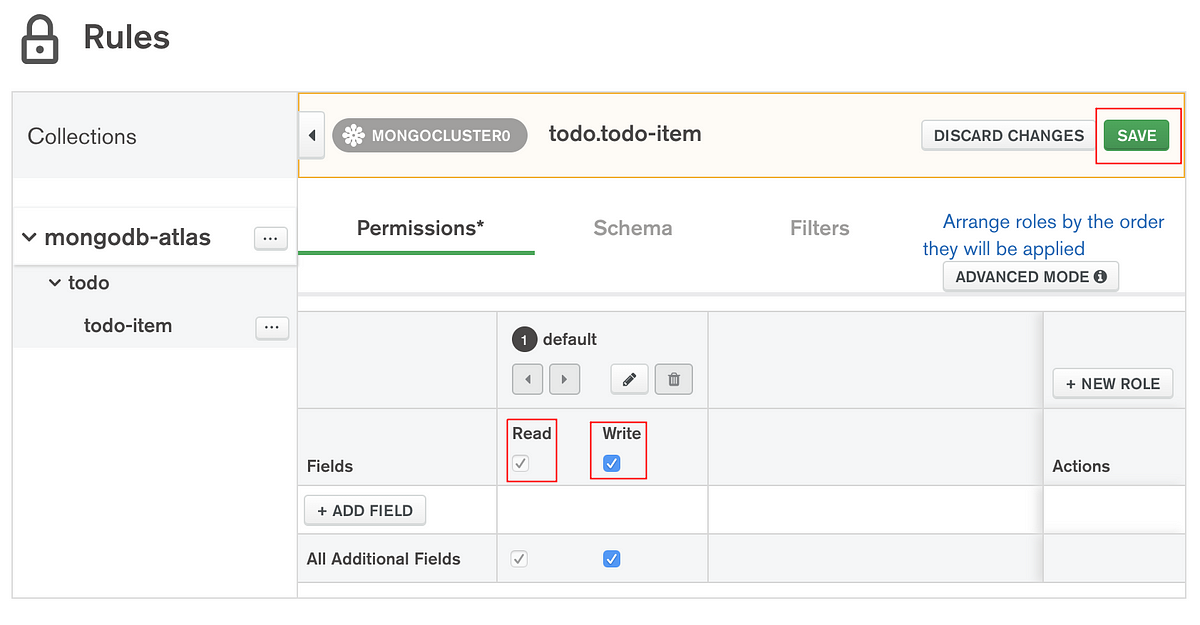
To enable reading and writing to the comments collection:
- Click the Read and Write check boxes for the default role.
- Click Save.
Code
Okay! Now that we are done with setting up Atlas, and now we can get to the really fun part… building our app! In your terminal run:
$ npx create-react-app mongodb-stitch-tutorial
$ cd mongodb-stitch-tutorial
$ npm install mongodb-stitch-browser-sd
$ npm start
In src/App.js replace the App component with this code snippet and save. Be sure to replace the YOUR_APP_ID with your client app id.
import React, { Component } from "react";
import {
  Stitch,
  AnonymousCredential,
  RemoteMongoClient
} from "mongodb-stitch-browser-sdk";
import "./App.css";

class App extends Component {
  constructor() {
    super();
    this.state = {
      todos: [],
      value: ""
    };

    this.handleChange = this.handleChange.bind(this);
    this.displayTodos = this.displayTodos.bind(this);
    this.addTodo = this.addTodo.bind(this);
  }

  componentDidMount() {
    // Initialize the App Client
    this.client = Stitch.initializeDefaultAppClient("YOUR_APP_ID");

    // Get a MongoDB Service Client
    // This is used for logging in and communicating with Stitch
    const mongodb = this.client.getServiceClient(
      RemoteMongoClient.factory,
      "mongodb-atlas"
    );

    // Get a reference to the todo database
    this.db = mongodb.db("todos");
    this.displayTodosOnLoad();
  }

  displayTodos() {
    // query the remote DB and update the component state
    this.db
      .collection("item")
      .find({}, { limit: 1000 })
      .asArray()
      .then(todos => {
        this.setState({todos});
      });
   }

  displayTodosOnLoad() {
    // Anonymously log in and display comments on load
    this.client.auth
      .loginWithCredential(new AnonymousCredential())
      .then(this.displayTodos)
      .catch(console.error);
  }

  addTodo(event) {
    event.preventDefault();
    const { value } = this.state;
    // insert the todo into the remote Stitch DB
    // then re-query the DB and display the new todos

    this.db
      .collection("item")
      .insertOne({
        owner_id: this.client.auth.user.id,
        item: value
      })
      .then(this.displayTodos)
      .catch(console.error);
  }

  handleChange(event) {
    this.setState({ value: event.target.value });
  }

render() {
    return (
      <div className="App">
        <h3>This is a todo app</h3>
        <hr />
        <p>Add a Todo Item:</p>
        <form onSubmit={this.addTodo}>
          <label>
            <input
              type="text"
              value={this.state.value}
              onChange={this.handleChange}
            />
          </label>
          <input type="submit" value="Submit" />
        </form>
        <ul>
          {/* Map over the todos from our remote DB */}
          {this.state.todos.map(todo => {
            return <li>{todo.item}</li>;
          })}
        </ul>
      </div>
    );
  }
}

export default App;
And that’s it!

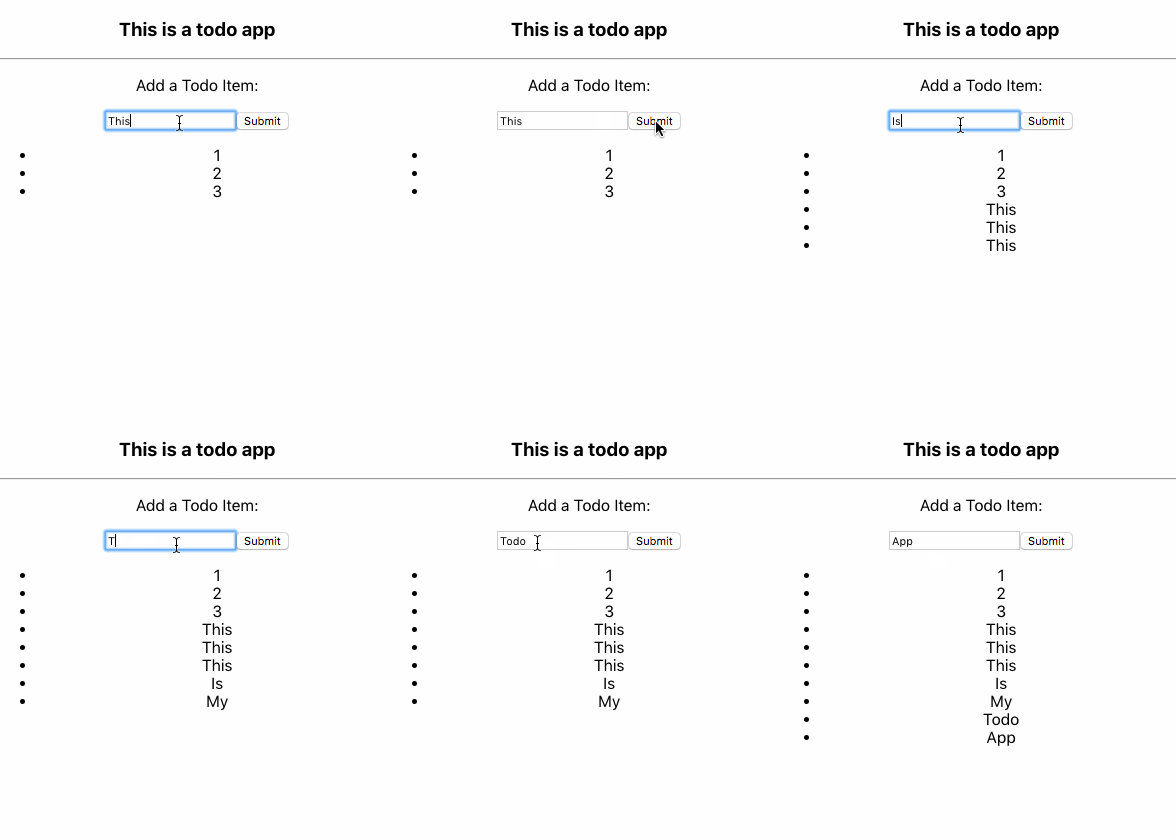
By the end, your app should look and work like this.
If you have any questions or comments, feel free to reach out or open an issue in the repo.
You can find the source code for this tutorial here: https://github.com/JoeKarlsson/mongodb-stitch-todo-tutorial

